
If your aio liquid cooler starts making a bubbling or rattling sound, you are not alone. Many users hear sloshing or faint clunks and worry their cpu cooling system is failing. In most cases, trapped air or minor pump issues cause the problem, and simple steps can restore quiet performance.
Corsair offers a helpful video guide that walks through safe troubleshooting for most coolers. This short guide will explain why air collects in loops, how excess air affects thermal performance, and when to check the pump or reposition the case. Use monitoring software to track temps and pump speed while you work.
Key Takeaways
- Trapped air or loose fittings often cause bubbling and rattling sounds.
- Small amounts of air in an aio liquid loop are normal; too much hurts performance.
- Check the cpu cooler pump and tightness of tubes if you hear irregular sound.
- Use software monitoring to watch temperatures and pump RPM during troubleshooting.
- Corsair’s video guide offers step-by-step help for common bubbling issues.
Understanding Why Your Liquid Cooler Makes Noise
Heat, trapped air, and tiny changes in pressure often create audible movement inside a cooler. Thermal expansion is a normal physical effect. Manufacturers leave a small pocket of air inside a sealed loop so the system can expand without stressing seals.
Over time, coolant evaporation and permeation let that air percentage grow. Udo Rietschel says 2%–10% air is common right after purchase. As the percentage rises, you may notice more pump noise or intermittent sounds from the radiator.
- Thermal expansion requires a tiny air gap in most aio liquid cooler designs.
- Coolant loss over time increases air pockets and can reduce cooling performance.
- A rapid rise in cpu temperature may mean trapped air is blocking heat transfer in the loop.
- Higher pump speed boosts flow and performance, but it can also make moving air more audible.
Practical takeaway: some air is normal, but persistent or worsening symptoms are a sign to inspect pump speed, seals, and radiator orientation as part of a calm, step-by-step solution.
How to Fix AIO Gurgling Noise Through Proper Installation
Keep the radiator above the pump so air collects in the radiator instead of the pump head. That simple change prevents many common issues in an aio liquid cooler and improves cooling performance.
Do not mount the radiator at the bottom of the case. When the radiator sits low, the pump becomes the highest point loop and traps air around the pump. That raises pump noise and risks the pump running dry under load.
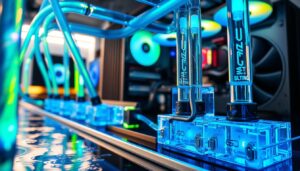
 water cooler, showcasing its internal components, like the pump and tubing, in a professional setting. The foreground highlights minute details of the tubing bends, with tiny air bubbles visible in the coolant, emphasizing the gurgling noise issue. In the middle ground, the sleek surface of the AIO unit catches soft, diffused lighting, reflecting a clean and efficient cooling system. The background features a subtly out-of-focus workstation, including tools like a screwdriver and thermal paste, creating a sense of an installation environment. The overall mood is technical and informative, underscoring the importance of proper installation to prevent gurgling sounds. The image should be clear, well-lit, and devoid of any distractions or text overlays.")
For best results, install the radiator at the front or top of the case. If top mounting is impossible, position the radiator so its highest point is still clearly above the pump. This keeps air moving into the radiator and out of the loop.
- Ensure the pump is below the highest point loop during installation.
- Adjust pump speed in BIOS or software to help purge trapped air.
- Correct placement reduces risk to the CPU and extends the life of your liquid coolers.
Active Troubleshooting Techniques for Trapped Air
When trapped air shows up, small, careful movements of the chassis often free it from the tubing. Start slow and work methodically to avoid jolting sensitive parts.

Tilting Your PC Case
Gently tilt the case left and right while the system runs. Corsair recommends this to help dislodge air bubbles from the tubes.
Move in small increments and pause to listen. If you transported the rig recently, trapped air in the cooler head is common.
Rotating the Radiator Orientation
If tilting alone does not help, rotate the case about 45 degrees in different directions. This can shift stubborn bubbles out of the radiator.
Always remove heavy components like the GPU or mechanical drives before moving the case. That prevents damage while you adjust orientation.
Managing Air Pockets
Encourage bubbles to collect in the radiator, the safest location in the loop. If sound or bubbling continues, the pockets may sit at the pump—the highest point loop in some setups.
- Tilt slowly, listen for changes.
- Rotate the case in small steps and check cpu temps.
- Keep the radiator as the system’s highest point when possible.
Adjusting Pump Settings for Optimal Performance
Use your cooler’s control app to tune flow before you start moving parts or swapping hardware. A short, deliberate software-led purge often clears trapped air and restores steady cooling performance.
Using Software to Maximize Flow
Set your pump to 100% for 30–60 minutes using the manufacturer’s software. The higher flow raises fluid pressure and helps force air pockets out of the pump head and tubes.
Watch your cpu temperature while the pump runs at full speed. If temperature rises unusually, stop and reassess settings or case airflow.
- Run a full-speed cycle for up to an hour to encourage trapped air to move into the radiator.
- If pump noise or persistent noise continues after an hour, check radiator placement in the case.
- Use software profiles to balance quiet operation with peak cooling when you need it.
High flow velocity improves heat transfer and often fixes intermittent sounds tied to air. Use monitoring tools to confirm stable temperature and long-term performance.
Conclusion
A calm, step-by-step approach will get most liquid coolers back to quiet operation. This guide shows that trapped air and simple setup choices cause most bubbling and gurgling in an aio liquid loop.
Keep the radiator at the highest point of the loop, use software to run the pump at higher speed for a short time, and move the case carefully while you listen and watch cpu temps. Small shifts often free air bubbles and restore steady cooling performance.
If noise or pump noise persists after these steps, contact the manufacturer. With basic care and the right routine, maintaining a quiet, efficient system is an achievable solution.
FAQ
Why does my water cooler make a bubbling or rattling sound?
Air trapped in the loop and small vapor pockets move through the pump and radiator, causing audible bubbling or rattling. Thermal expansion and minor coolant evaporation can also introduce tiny gas pockets that migrate to the highest point in the system and create sound as they pass the impeller or channels.
Can coolant evaporation cause intermittent sounds over time?
Yes. Over months, coolant can slowly permeate through tubing or evaporate from microscopic seals, creating small gas pockets. Regular checks and topping off closed-loop coolers or servicing custom loops reduces the risk of new bubbles forming.
How does installation affect trapped air and sound?
Mounting orientation matters. If the radiator sits below the pump or the fill point is not at the highest point, air can collect near the pump and cause noise. Ensuring the reservoir or fill port is at the top of the loop helps vent trapped air during initial bleeding.
What’s the best way to remove air pockets without draining the system?
Power the fans and pump with the case tilted or gently rocked so air moves toward the fill point. Short on/off cycles of the pump can help dislodge stubborn bubbles. Keep the highest point open if possible to let air escape safely.
Should I change radiator orientation to reduce sound?
Rotating the radiator so inlet and outlet run horizontally or placing the fill/reservoir higher than the pump helps prevent air from settling near the pump. Try small adjustments and observe CPU temperatures to ensure cooling performance stays consistent.
Does increasing pump speed eliminate rattling?
Raising pump speed can push pockets through faster and reduce audible movement, but it may also increase wear and pump noise. Use motherboard or pump software to test higher RPMs briefly and balance silence with cooling needs.
Is it safe to tilt or rotate my PC while the pump runs?
Yes, but do so carefully. Short, gentle tilts while monitoring the system are fine. Avoid abrupt motions and ensure power connections are secure. If you have a removable fill port, use it as the highest vent while working.
How often should I check or top off liquid coolers?
For closed-loop coolers like those from Corsair or NZXT, inspection every 6–12 months is reasonable. Custom loops may need more frequent checks for coolant level and clarity. Top off only when the system is cool and follow the manufacturer’s fluid recommendations.
When is professional servicing or replacement recommended?
If persistent sounds continue after bleeding, orientation changes, and pump speed adjustments, consider servicing or replacing the unit. Signs include rising CPU temperatures, visible leaks, or a pump that fails to spin at expected RPMs. For branded units, contact the maker’s support for warranty options.
Can software help manage pump behavior to reduce sound?
Yes. Many motherboards and vendor apps let you set pump curves or fixed RPMs to balance flow and acoustics. Use these tools to test lower stable speeds during idle and higher profiles under load to minimize audible activity without sacrificing cooling performance.

Hardware enthusiast and cooling specialist sharing real-world tips on water cooling, thermal performance, and custom PC builds.