I wrote this guide to help you master a safe, reliable install for your high-performance PC. I walk you through each critical step so your CPU stays cool and your parts stay protected.
First, I explain how a typical air coolers setup differs from a modern liquid cooling system. Knowing that difference makes it easier to choose the right gear and mounting method.
My goal is clear: give beginners and enthusiasts a confident plan to mount a cpu liquid cooler securely and get peak thermal performance. I cover tips for cable routing, pump placement, and fan orientation to keep temperatures low during heavy workloads.
By following this simple, tested approach, you will learn how to balance function and looks so your build runs cool and looks great.
Key Takeaways
- I offer a clear step-by-step plan to install aio hardware safely.
- Learn the main differences between air coolers and liquid cooling.
- Practical tips on mounting, routing, and securing the cpu cooler.
- Focus on preventing damage and ensuring consistent thermal control.
- Guidance fits both first-time builders and experienced users.
Preparing for Your AIO Liquid Cooler Installation
I always start by doing a quick inventory and taking a careful look around the case. Confirm the package includes brackets, screws, fans, and any mounting plates before you proceed.
Pick the right size: units come in 120mm, 240mm, or 360mm radiator lengths based on fan count. Measure your chassis so the radiator fits without blocking RAM, GPU, or drive bays.
Set up a clean workspace and gather the things you’ll need: screwdriver, thermal paste (if not pre-applied), and the manual. Organizing first saves time and prevents mistakes.
Check case airflow. Make sure intake and exhaust are sufficient to support the cooling performance you expect. Note the fan orientation: the convex side usually pulls air in and the concave side pushes it out.
“Modern liquid cooling products are user-friendly, but reading the manual is still crucial.”
- Look around for models that match your build, like the Cooler Master MasterLiquid Atmos.
- Verify radiator clearance before you start to avoid rework.
Verifying Compatibility and Gathering Necessary Tools
I start by checking physical fit and socket support so nothing blocks the install later. This step saves time and prevents damage. It also keeps the build tidy when I begin work.
Case Size Requirements
Measure the chassis to confirm radiator space. Most radiators range from 120mm to 360mm. Make sure the chosen radiator won’t hit RAM, GPU, or drive bays.
Look around for compatibility lists from the manufacturer. That helps avoid buying parts that won’t fit your case.

CPU Socket Compatibility
Check the cpu socket on your motherboard. Many kits list support for Intel LGA 1700 and AMD AM4. Intel and AMD platforms need different brackets and mounting steps.
- Confirm the package contains brackets and screws.
- Gather a Phillips screwdriver and verify the aio cables match motherboard headers.
- Tip: Verify motherboard layout for header placement so cables reach without strain.
This short prep routine makes the rest of the guide smooth. Proper tool and compatibility checks ensure the cooler and cooling parts fit and function as expected.
Installing an AIO Liquid Cooler onto the CPU
Start this phase by fitting the proper mounting bracket to your motherboard for the exact cpu socket. For example, the T-FORCE SIREN GD240E ARGB CPU liquid cooler uses a dedicated bracket for Intel 1700. Use the correct bracket for Intel or AMD so the water block stays stable.
Applying Thermal Paste Correctly
I recommend the 5-point method to apply thermal paste. Place small, pea-sized drops across the CPU surface so the compound spreads evenly when the water block presses down.
Remove the protective film from the water block before seating. Align the block with the motherboard holes and lower it straight down onto the cpu.
Secure the block with screws using an X-pattern. Tighten each screw a little at a time so pressure stays even. Take your time—rushing risks poor contact or motherboard stress.
- Confirm bracket type for Intel or AMD first.
- Use the 5-point paste method for even spread.
- Tighten screws in an X-pattern for uniform pressure.
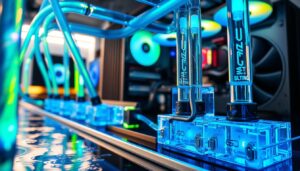
Mounting the Radiator and Fans for Optimal Airflow
How you place the radiator and orient the fans directly affects airflow and overall cooling performance. I cover the common layouts and practical tips so you get quiet, efficient results.
Front Panel Intake Configuration
Front installs pull cool air through the radiator into the case. This is great when you want lower intake temps for the cpu and GPU.
When you use the front panel, position the fans to pull fresh air from outside. Use the long screws supplied to fasten the radiator fans to the frame.

Top Exhaust Placement
Placing the radiator at the top case is often best for overall performance. I prefer this way because warm air naturally rises and the pump stays free of trapped bubbles.
Set the fans to push air out of the top. Align the holes with your case mounts and tighten the screws gradually so the fins stay undamaged.
Managing Tubing Orientation
Keep tubes relaxed and avoid tight bends that could kink or add tension to the block or radiator. Routing matters as much as fan direction for steady cooling.
Final step: double-check fan spin direction and cable reach to motherboard headers so fans have power and the whole setup runs smoothly.
Connecting Cables and Powering the System
I always map out every cable connection first to avoid surprises when I power up the build. Start by identifying each lead so you know which plug goes to the motherboard.
Pump and water block power matter most. You must connect the pump power cable to the AIO_PUMP header on your motherboard to ensure a steady voltage. Also confirm the power cable for the water block is fully seated before you move on.
Recognize signal types. The ARGB lead is a 5V 3 PIN connector and differs from a standard fan cable. If you have ARGB, plug that signal cable into the correct header to control lighting.
- I suggest a fan splitter if your motherboard lacks headers so all radiator fans can share a single CPU_FAN header.
- Route cables neatly to improve airflow in the case and reduce cable strain near screws and mounts.
- Before first power on, double-check every connection and secure any loose plugs.
| Component | Header | Type |
|---|---|---|
| Pump | AIO_PUMP | Constant power (3- or 4-pin depending on board) |
| Radiator fan(s) | CPU_FAN or splitter | Fan power (PWM) |
| ARGB | 5V ARGB header | 5V 3-PIN signal |
After you verify connections, power on the system. Listen for a steady, quiet hum from the pump. That confirms the cooling loop has power and the cpu is ready for testing.
Maintaining Your Liquid Cooling System for Longevity
A little maintenance every few months prevents big problems later. I keep checks simple so they fit into regular PC care. Follow a few steady steps and your system will stay reliable.
Cleaning Dust from Radiators
Make sure to clear dust from the radiator and radiator fans every 1-2 months. Use compressed air and blow through the fins from the side opposite airflow.
Keep fans unblocked and the front and top case vents clean. This keeps air moving and prevents your cpu from running hot.
Monitoring Pump Performance
Watch idle cpu temps; they should sit near 30-50°C. If temps climb or the pump makes odd noises, check the pump power cable and motherboard header immediately.
- Use software to log temps and fan speeds.
- Reapply thermal paste every 1-2 years for best contact.
- Inspect for leaks around the water block and radiator on each check.
With routine care, these aio products often last 4–7 years. I run quick checks monthly and deeper checks twice a year to extend life and keep performance steady.
Final Thoughts on Your Cooling Setup
I finish by urging one last round of checks: fan direction, pump power, and thermal contact. Do this before you run stress tests to lock in steady performance.
Good maintenance keeps parts safe. Clean dust, monitor temps, and reapply paste when needed to extend the life of your liquid cooler and other cooling products.
I hope this guide gave you the confidence to complete each step and care for your CPU. If you feel unsure at any point, revisit this article for clear instructions and visuals.
Thanks for reading — enjoy a quieter system, better temps, and the clean look that a well-installed cooler brings to your build.
FAQ
How do I know my case fits the radiator?
I measure the available space where I plan to mount the radiator—top or front—checking clearance for fans, motherboard heatsinks, and RAM. I compare those measurements to the radiator size (120/240/360 mm). I also look at the case manual for supported radiator lengths and confirm there are mounting holes in the correct positions.
Which CPU sockets are supported by most water blocks?
I check the product page for socket compatibility. Most popular blocks support Intel LGA 1700/1200/115x and AMD AM4/AM5, but I always verify the included mounting brackets match my motherboard’s socket before I start.
How much thermal paste should I use?
I apply a rice-grain or pea-sized dot in the center of the CPU. When I lower the block, the paste spreads evenly. This avoids excess that could squeeze out and ensures proper heat transfer.
Which fan orientation gives the best airflow for a front-mounted radiator?
For front installation I set the fans to pull cool air into the case through the radiator. That brings in fresh air from outside, improving cooling for the pump and other components. I ensure intake fans have dust filters if available.
Should I place the radiator on the top or front of the case?
I prefer front mounting for maximum fresh intake, but top placement as an exhaust works well if my case airflow already pulls cool air from the front. I pick the location that balances radiator performance and overall case airflow.
How should I orient the tubing and pump to avoid issues?
I route tubes so they’re not kinked and keep the pump slightly lower than the highest radiator point when possible. That helps air escape to high spots and reduces pump strain. I also keep tube bends gentle and secure them away from moving parts.
Where do I connect pump and fan power cables?
I connect fans to the CPU_FAN or a dedicated AIO_FAN header on the motherboard and plug the pump into the CPU_FAN, AIO_PUMP, or a SYS header set to full power. I use fan curves in BIOS for balanced noise versus cooling and ensure the pump receives uninterrupted power.
How often should I clean my radiator and fans?
I clean dust from radiators and fan blades every three to six months depending on my environment. I use compressed air in short bursts and a soft brush for stubborn dust. Regular cleaning keeps thermal performance steady.
What signs indicate a failing pump?
I watch for unusual noise like grinding, rising CPU temperatures despite fan speed, or visible leaks. If I notice inconsistent RPM or warm spikes under light load, I inspect connections and consider replacing the pump or entire unit if problems persist.
Can I reuse mounts and brackets between Intel and AMD sockets?
I check the manufacturer’s accessory kit. Some brands include universal brackets that work across Intel and AMD, but others provide socket-specific parts. I avoid forcing incompatible brackets to prevent damage to the motherboard or block.
Do I need to remove the motherboard to install the backplate?
I often can install the backplate with the board in the case if the case design allows access. If access is limited, I remove the motherboard for a cleaner and easier install—this avoids stress on standoffs and makes alignment simpler.
Is it safe to run the pump at full speed all the time?
I usually run the pump at full or near-full speed to ensure consistent coolant circulation and stability. Modern pumps are designed for continuous duty, and a steady RPM helps prevent temperature spikes and air buildup.

Hardware enthusiast and cooling specialist sharing real-world tips on water cooling, thermal performance, and custom PC builds.